

Information
Do you and your partner want to log how much you're spending for your household and merge the expenses entered on your individual devices?
Are you on holidays with friends and want to know how much you are spending? If you are sharing your expenses, do you need a tool to document your balances and debts to one another?
Do you want to know how much you're spending for your hobby, on your business trip, or any other expenses?
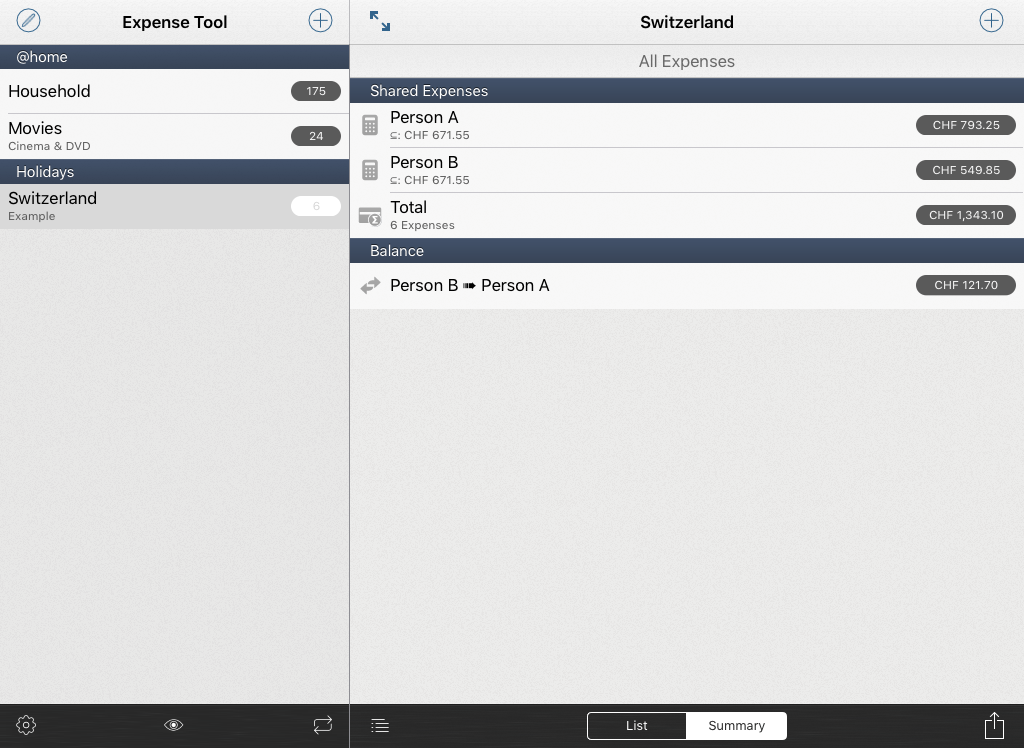
Use Expense Tool, create an expense set and start entering your data. Your expenses can be listed, shown on a map, exported by email, printed and transferred to another iOS device. If more than one person is part of an expense set, you get a summary showing the total of all individual expenses and the balance of the shared expenses.


Features
- Define Expense Sets with custom settings
- Add expenses and optionally attach receipts, photos and locations
- Fast data capture: Select with autocompletion what you've already entered
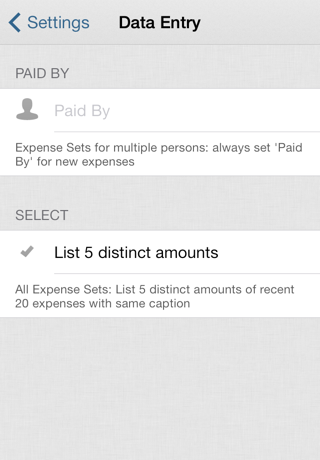
- List your expenses: all, by month, by week or within a custom timeframe
- Expense list sections: by person, by expense caption
- Summary and Balance of shared expenses
- Overview of all expense sets
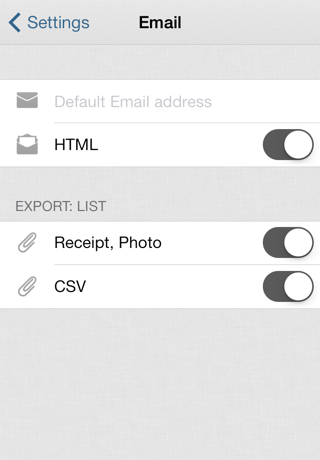
- Export your data as email (html, text, csv)
- Printing
- Data Exchange between iOS devices
- Geocoding and map integration
- Backup and Import
- Passcode Lock
- iPod Touch, iPhone, iPad
- Languages: English, German, Italian, French, Spanish
Frequently Asked Questions
General
What is Expense Tool?
Expense Tool is a simple, yet powerful iOS Application to collect and organize your own and shared expenses.
What can I use it for?
You can use Expense Tool to collect information about your expenses.
Let's assume two situations:
You want to know how much you're spending for your hobby:
Create an Expense Set 'Hobby' and start entering all expenses for it.
Then you see the total you spent (overall, by month, by week - or within a custom timeframe you choose).
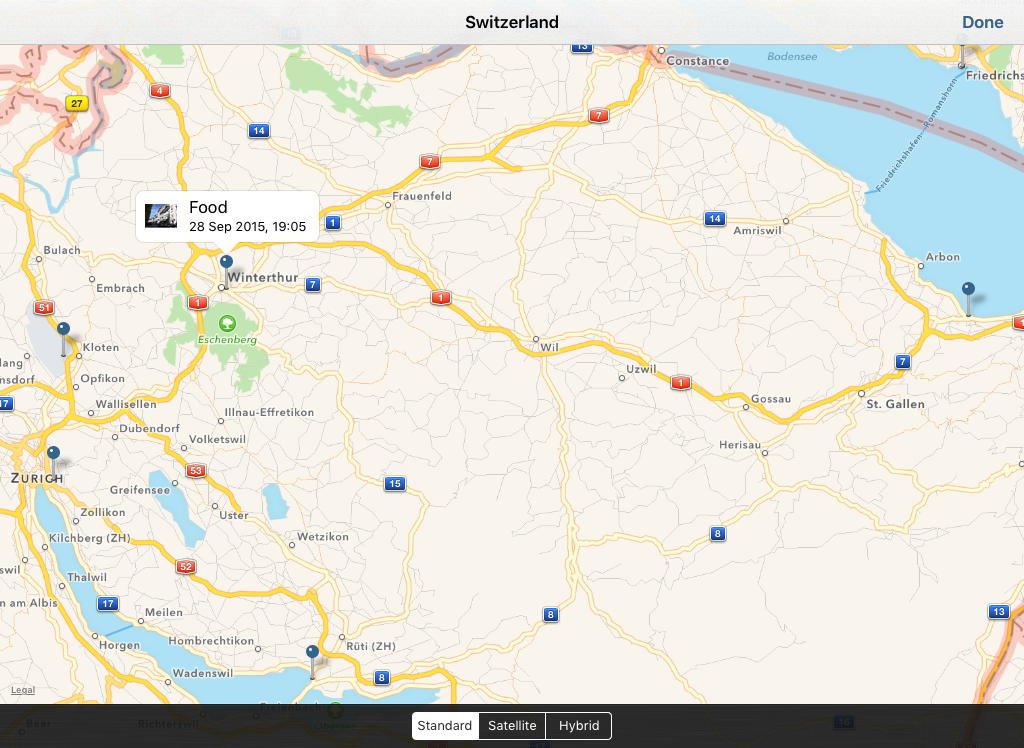
And of course you can see the location of your expeneses on a map, and you can export the list.
You're going on holidays with two friends:
Create an Expense Set 'Holidays' and start entering all expenses for it.
Then you see the total each one of you spent and the overall total.
And if you want to share your expenses, you don't need to calculate anything - Expense Tool will show everyone's share and calculate the balance.
And of course you can see the location of your expenses on a map, or can export the list and summary.
What doesn't Expense Tool do?
Expense Tool is what it's name says. In short: You can manage expenses in lists (Expense Sets).
The App is not intended for purposes such as: Accounting, Budget, Income, etc.
Where is it available?
Expense Tool is available on the App Store.
What are the requirements?
You need an iOS device (iPod Touch, iPhone, iPad) running iOS 9 or newer.
Lite-Version: Expense Tool LE
Features: What's the difference?
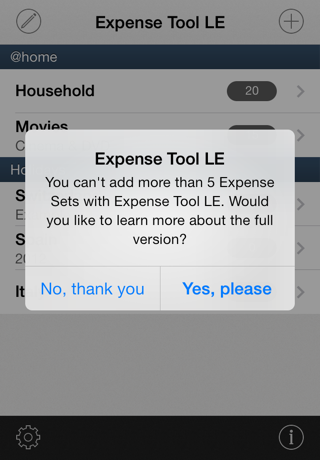
- Number of expense sets
Lite version: 5, Full version: unlimited - Number of expenses per expense set
Lite version: 20, Full version: unlimited
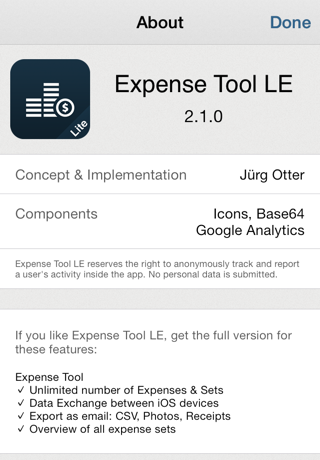
The following features are only available in the Full version of Expense Tool:
- Export of data as CSV
- Overview of all expense sets
- Data Exchange between iOS devices
Why a Lite-Version?
If you'd like to get to know Expense Tool, you can download the Lite version Expense Tool LE for free. The smaller feature set is enough to manage a couple of smaller expense sets.
If you like the iOS app and intend to use it often, to add more expenses and sets, then get the Full version of Expense Tool.
Automatic Data migration (iCloud)
Requirements: Expense Tool in Version 2.0.0 or newer, iOS 5.1 and an enabled iCloud account.
The data migration works automatically.
- Before you're going to migrate your data, make sure that you've launched (and quit using the Home-button) the Lite-Version (2.0.0 or newer) at least once before the first launch of the Full Version.
- The Lite-Version saves your data in a local iCloud-Container. This folder is only available on your device, it is not being transferred to the iCloud.
- When you first launch the Full Version (2.0.0 or newer) it will look for the Transfer-data of the Lite-Version, copying it if available. The Transfer-Folder is always being removed after that.
Please note: The data migration occurs only once. If you're still entering data in the Lite-Version, it won't be merged into the Full Version. If you're launching the Full Version before you've updatet (and launched / quitted) the Lite-Version, or if the Lite-Version has never been launched, your data can not be migrated using the local iCloud-Container.
Manual Data migration
You can use the Backup/Import features in order to manually migrate your data. Please refer to the section Data Management of the FAQ to get to know how these features work.
- Lite Version: Create a backup, copy it to your computer using iTunes FileSharing
- Full Version: Copy the Lite Version's Backup to the App using iTunes FileSharing, Launch the Full Version, Import the Backup within the App
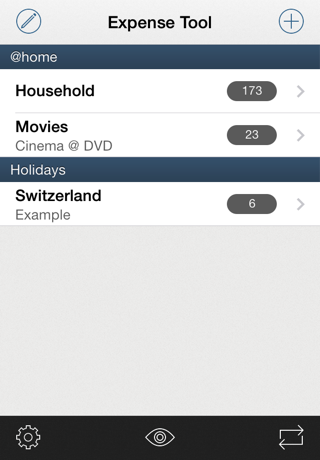
Expense Sets
What is an Expense Set?
An Expense Set defines a List, into which you can enter data later.
You can use it to group the expenses you're going to enter.
An example with multiple Expense Sets, or with different 'Topics', for which you're intending to keep an eye on their expenses:
- Group: Holidays, Expense Sets: Holidays in A, Holidays in B, Holidays in C
- Group: Private, Expense Sets: Household, Movies/Cinema, My Hobby
Die Groups are intended to organize your Lists (Expense Sets). You'll get a sub-total of all expense sets within a group in the overview.
Note: Think about how you're going to organize your lists (Expense Sets).
The App is designed to can enter expenses in multiple lists (Expense Sets). It's not intended for accounting purpose of all your expenses.
If you're using the data exchange feature: You can exchange data for a single or for multiple expense sets.
Reason: You'd like to exchange 'Holidays in A' with your partner, but not the expense sets 'My Hobby' and 'Business Expenses'.
How to create an Expense Set?
- Tap the + button in the lists of your Expense Sets.
- Enter the Group of the new Expense Set (or choose one of the existing groups).
- Enter the Name and optionally a Description.
- Choose the Currency by selecting a country in the list.
- Enter the name of the persons, who are spending expenses in this expense set.
If you add more then one person: You can optionally define a Factor. The factor defines the suggested amount for the balance of shared expenses. - When you're going to enter expenses later, and you need to record more information other than 'Name' and 'Notes' (e.g. 'Paid with'), you can enter the caption of this Additional Field.
-
Make your choice in the settings.
What do you want to attach to the expenses in this Set? Receipt, Photo and/or Location. - Finally save the new expense set by tapping the Done button.
Why can't I add an Expense Set?
One of the following is most likely the answer to your case:
- The name of an Expense Set has to be unique.
You can't have two expense sets with the same name. - You haven't entered a person for this expense set yet.
How to edit an Expense Set?
- Tap the Edit button in the lists of your Expense Sets.
- Edit the properties and settings of the expense set.
- To save the changes, tap the Done button.
How to delete an Expense Set?
In the list of your Expense Sets, tap the Edit button, then push the - button left to the Expense Set you want to delete. Confirm the deletion by taping on Delete.
Note:
This immediately deletes the Expense Set and all Expenses, including their attachments.
If you haven't created a backup (please refer to the corresponding section in the FAQ), there is no way to restore your data.
What are the persons in an expense set for?
It is required to enter at least one person. If the expense set will contain only private expenses, enter your own name.
If you enter two or more persons, you can choose who of these persons paid an expense. You can also enter for whom an expense has been paid for (for all persons, or only for a couple).
The Summary then calculates, how much each person has spent, the amount for each one's shared expenses - and most of all: who needs to pay whom how much in order to solve your balances and debts to one another?
What are the factors for the persons used for?
If two or more persons are in an expense set, you can define a factor for each person. This defines the Balance of shared expenses.
Example:
- Factor Person A: 1x
- Fakcor Person B: 2x
Your enter a new expense of CHF 60.-
According to the factors, the amount to pay is:
- Person A: CHF 20.- (1x)
- Person B: CHF 40.- (2x)
What happens if the settings are being changed?
Dis/Enabling Receipt, Photo or Location does not change Expenses already entered. No data is being deleted.
The settings only affect the ability of displaying the choosen attachments for existing and new Expenses.
Changing the currency does not change the amounts of the existing expenses. E.g. if you change from EUR to CHF, an existing expense for EUR 12 will be displayed as CHF 12.
Expenses
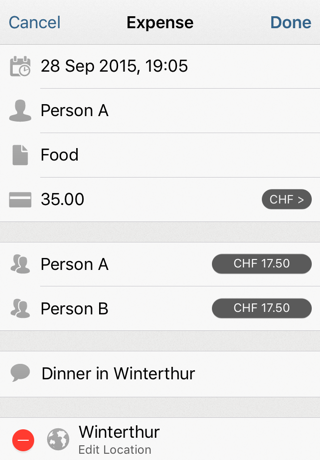
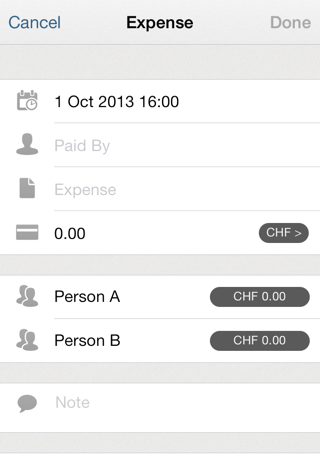
How to add an Expense?
- Navigate to the appropriate Expense Set. Change the display to List.
- Tap the + button in the Expenses listing.
- The current date is already entered. Should you need to change it, tap this cell.
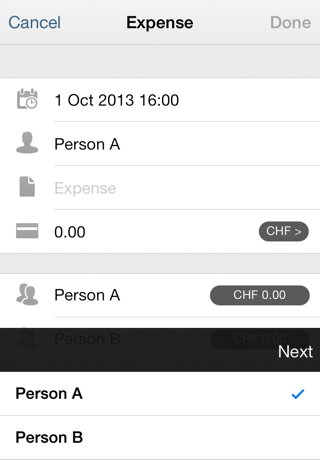
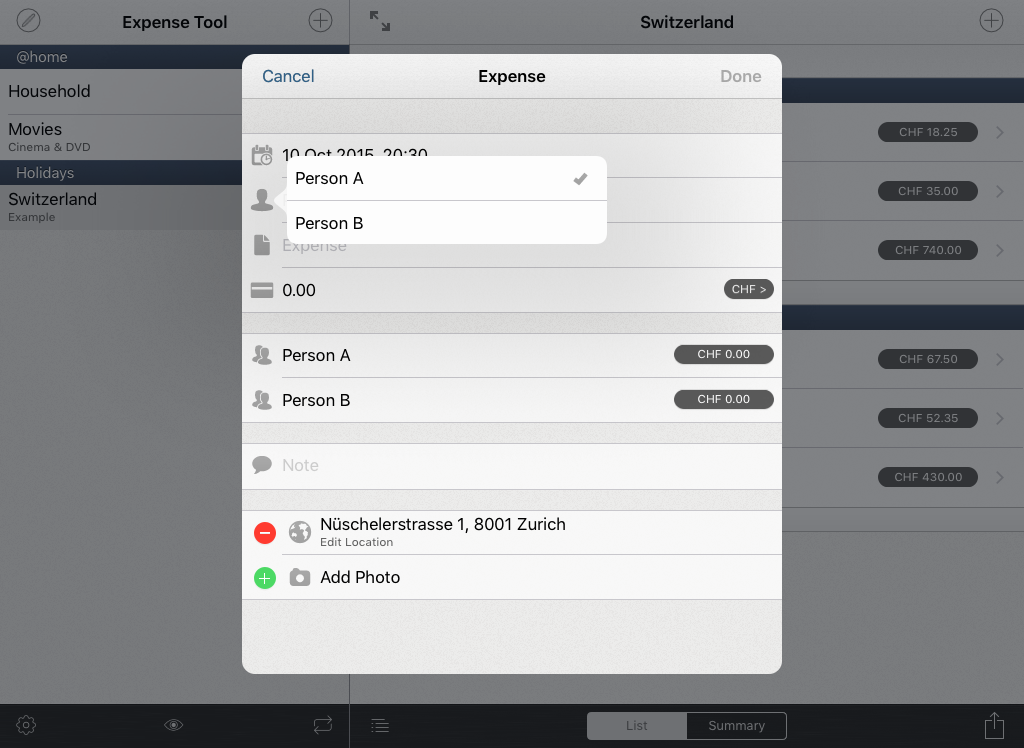
- In an expense set for multiple persons: Choose the person, who paid for this expense.
-
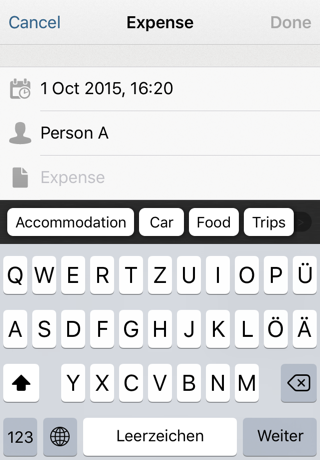
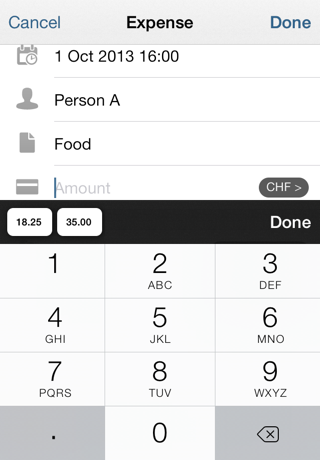
Enter or choose the Caption / Name of the Expense.
Note:
It's recommended to enter a general Name, such as 'Dinner'. If you're adding expenses later, you can choose the Expense-Name's you've already entered. So the choice 'Dinner' will be a better choice to re-select than 'Dinner at Restaurant XY in City AB'. This will keep the autocompletion-list small. -
Enter the Amount of the Expense.
Note:
If you're adding an Expense in a foreign currency, you can use the Foreign Currency Converter by tapping the currency-badge. -
In an expense set for multiple persons, the 'amounts to pay' according to the factors (please refer to the Expense Set - settings) for each involved person are shown.
You can de/select the persons, for whose this expense has been paid. - Optionally you can fill in the Additional Field (refer to the Expense Set - Settings) and a note (e.g. the Name of a restaurant).
- Optionally (and according to your Expense Set - Settings), attach Receipt and/or Picture.
-
If attaching the Location is enabled for the Expense Set (refer to the Expense Set - Settings), the current location will be set for the new Expense.
Note:
If you're adding an Expense and are not in the corresponding location, you can Edit or Delete the Location. - Tap the Done button to save the new expense.
How to edit an Expense?
- Navigate to the Expense Set. Change the display to List.
- Select the Expense and tap Edit on its detail view.
- Tap the Done button to save the changes.
How to delete an expense?
Navigate to the expense and tap the Delete button in the toolbar. You can also delete an Expense in the List view by simply swiping through it and tapping Delete.
Note:
This immediately deletes the Expense, including its attachments.
If you haven't created a backup (please refer to the corresponding section in the FAQ), there is no way to restore your data.
What kind of expense types are available?
In an expense set for multiple persons, you can choose for whose person(s) an expense has been paid for.
There are three kinds of expenses types:
- Private: Paid by 'Person A', only paid for 'Person A'.
This expense will not be part of the shared expenses, but it's part of the total of 'Person A'. - Borrowed: Paid by 'Person A', only paid for 'Person B'.
This expense will not be part of the shared expenses, but it's part of the total of 'Person A'. For the summary: 'Person B' has to pay back the full amount to 'Person A'. -
Shared: Paid by 'Person A', paid for two or more persons.
This expense will be part of the shared expenses. The amounts-to-pay for each involved person are shown - according to the factors of the expense set - settings.
Note: You can edit and fix those individual 'to-be-paid' amounts by tapping on the amount-badge.
How to split an expense?
An expense entered in Expense Tool is always paid by exactly one person. Should multiple persons pay, you have to enter each of their expenses individually.
It is possible to define the 'amount to be paid' for the balance of shared expenses.
Example: 'Person A' pays dinner in a restaurant for 'Person A', 'Person B' and 'Person C' with
a total amount of 80.-.
For the balance, you want to set that 'Person A' and 'Person C' should pay 20.- each,
'Person B's' share of this expense is 40.-.
- Paid by 'Person A': 80.-
- Paid for: choose Persons A, B, C
-
For each of the selected persons: Tap the amount-Badge in order to
enter the individual amounts and therefore 'fix' these values.
'Person A': 20.-
'Person B': 20.-
'Person C': 40.-
Note: If the individual amounts for the balance are 'fixed',
a Lock-Icon will appear next to the amount.
If you're going to change the factors of the Expense Set, these fixed amounts will remain untouched.
Not 'fixed' amounts will always be splitted according to the Factors-Settings of the Expense Set.
How to enter a foreign currency amount?
To open the simple Currency-Calculator: Tap the Currency-Badge when you're entering the amount.
If you've already entered foreign currency amounts in other expenses, you can choose the currency and exchangerate by tapping the entry in the list below.
- Choose the currency by entering the country.
-
If an Internet-Connection is available, the current Exchange Rate will be fetched and entered.
Otherwise, you'll need to enter the exchange rate manually. - Enter the Amount in the foreign currency.
-
The simple currency calculator will display the result: Amount * Exchange Rate.
In order to use the calculated amount: tap the cell with the result.
How to add/edit/delete Receipt or Photo?
Navigate to the Expense and tap Edit
To Delete the Receipt or Photo, tap the delete button on the left. Confirm with the Delete-button.
To Add a Receipt or Photo, tap on Add Receipt or Add Photo.
Note:
If your device has a camera, you can either take a picture or choose an existing one.
If your device doesn't have a camera, you can only add existing photos from your library.
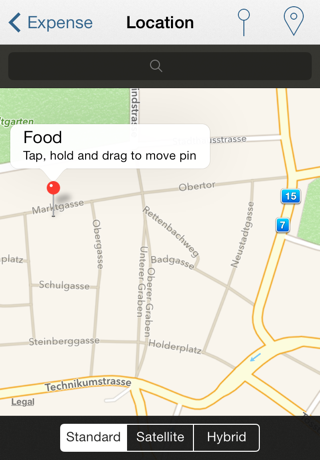
How to add/edit/delete the Location?
If you add an Expense, the current location is added. If you need to edit the location because you're not in the location where the Expense took place, or if you want to delete the location: Navigate to the Expense and tap Edit
To Delete the Location, tap the delete button on the left. Confirm with the Delete-button.
To Edit the Location, tap on the cell showing the Location. You have several ways to change the Location:
-
Enter the location name in the search field and tap search. If a location could be found, the pin is dropped. If multiple locations are found, you'll have to choose the correct one in a list.
Note: The location - search is done using Apple Maps. A correct search result can't be guaranteed. - Move the map if required. Tap the button with showing a Pin, in order to set the location-pin in the center of the currently displayed map.
- Tap the button showing the symbol for the current location. The location pin will be dropped according to your current location.
- Especially after searching for a location, you can fine-tune the exact position on the map. Tap the pin and keep holding it. Then you can drag the pin on the map to the exact location.
List Organisation
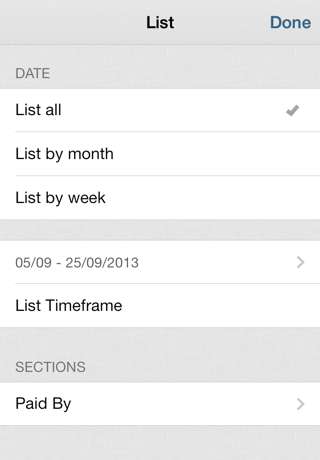
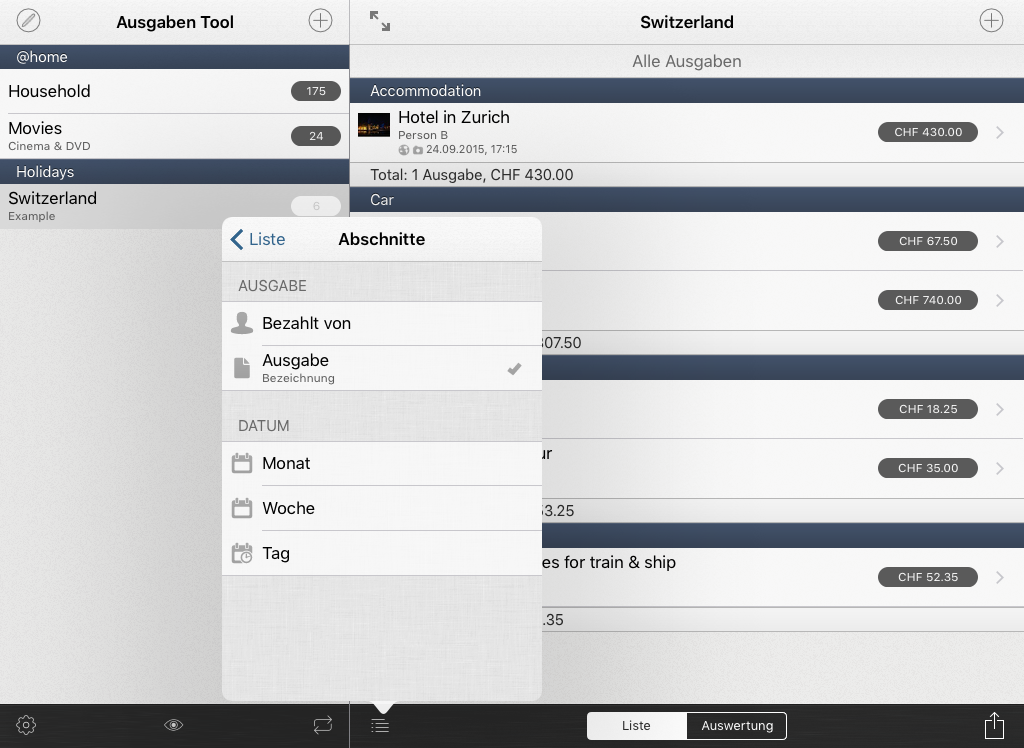
How can the List and Summary be organized?
Tap the Edit button (showing a calendar and pencil) on the bottom left in the List or Summary view.
Timeframe
In order to organize the list by date/time, the following options are at your choice:
- List all: This will list all expenses.
- List by month/week: This will list the expenses by month/week. You can navigate through the months/weeks using the arrows in the grey navigation bar at the top.
- List timeframe: This will list all expenses in the from - until range you selected.
Sections
The expenses in the list are grouped into sections.
You can select the sections:
- Expense - Paid by: The list is grouped by the persons.
- Expense - Name: The list is grouped by the caption of the expenses.
- Date (Month, Week, Day): All expenses of the month/week/day are in their own section.
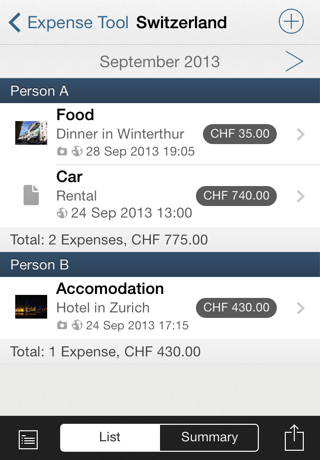
Summary
How to show the summary?
Navigate to the Expense Set. On the bottom, there is a segmented control. Tap on summary.
What is shown in the summary?
In an expense set for a single person, only the total is being shown.
An expense set for multiple persons will show a summary of all expenses.
- Private: The total of all private expenses of each person.
- Borrowed: The total of all borrowed amounts of the persons.
- Paid by: All paid expenses (including private and borrowed amounts).
- Shared Expenses: Only the expenses paid for two or more persons are included in the shared expenses.
- Balance: The App calculates, who pas to pay whom how much. For that, both shared expenses and borrowed amounts are being taken into account.
Data Exchange
Why Data Exchange and not Synchronisation?
Expense Tool is simple, yet powerful. And such is it's Data Exchange.
Data Exchange allows to compare all Expenses in an Expense Set from an iOS Device with another Device. Not existing Expenses of the other Device will be transferred and added. Expenses that are modified on one Device will be changed on the other Device.
It is not a synchronisation, because no expenses are going to be deleted. Furthermore, not all Expense Sets are being transferred, only the ones whose expenses you really want to exchange.
Most important: Data is only sent from Device to Device - there are no external servers on the internet involved, where your data needs to be stored.
When is Data Exchange a useful feature?
Two Examples:
Two people live together. Both create an Expense Set 'Household'. To merge their data, both call the Data Exchange Action in their Expense Set. After choosing the Device of the other person, their data will be exchanged. So they have the expenses of the other person on the own device.
Expenses, which are entered on the iPhone while not being at home can be transferred to the iPad at home. This of course works as well if there is more than one person (or more than one iPhone) and one iPad used by several people.
What are the requirements?
In order to use the Data Exchange Feature, it obviously requires two iOS devices. Expense Tool (preferrably in the same version) needs to be installed on both devices involved.
Transfer using Bluetooth: Both devices have to support Bluetooth.
Transfer using Wi-Fi: Wi-Fi needs to be enabled on both devices. And the two devices have to be connected to the same network.
Finally, in the Settings of Expense Tool, both devices need to be configured to use the same data transfer method (Wi-Fi / Bluetooth).
What are the settings used for?
Expense Tool 2.3
Choose this option if both devices are running iOS 7 (or later). Availability of Bluetooth and/or Wi-Fi gets determined automatically.
In order to use Bluetooth, Bluetooth has to be turned on on both devices. In order to use Wi-Fi, both devices need to be in the same Network.
Expense Tool 2.0
Choose this option if one (or both) devices are running iOS 6 (or previous).
To successfully use the Data Exchange feature, both devices need to be configured to use the same data transfer method Online (Wi-Fi) and/or Nearby (Bluetooth). This choice of names are defined by Apple in the dialog which lets you choose the data transfer method.
If both options are enabled, you always have to choose between the two later. If you always and only want to transfer using Bluetooth, you can disable Online (Wi-Fi). Then this choice won't appear any more.
Please note the requirements described in the previous question.
How is data being related on multiple devices?
If you've already entered data on both devices, please check the following issue, before you're using Data Exchange:
-
Name of the Expense Set
In order to transfer the expenses into the correct Expense Set, the following prerequisite has to be met: The name of the Expense Set needs to be exactly the same on both devices. -
Name of the persons
In order to assign the expenses to the correct persons, the following prerequisite has to be met: The name of the persons needs to be exactly the same on both devices.
Example: On one device you've entered expenses for 'Hans Meier'. On the other device, the expenses are for a person named 'Hans'.
Result: After Data Exchange there are two persons in the expense set: 'Hans' and 'Hans Meier'.
How does the Data Exchange work?
Using Data Exchange, you can exchange one or multiple expense sets with another device.
In order to relate the data correctly on both devices, please read the previous question and answer!
The Data Exchange between iOS devices works like this:
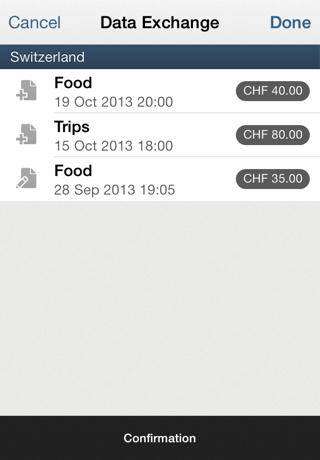
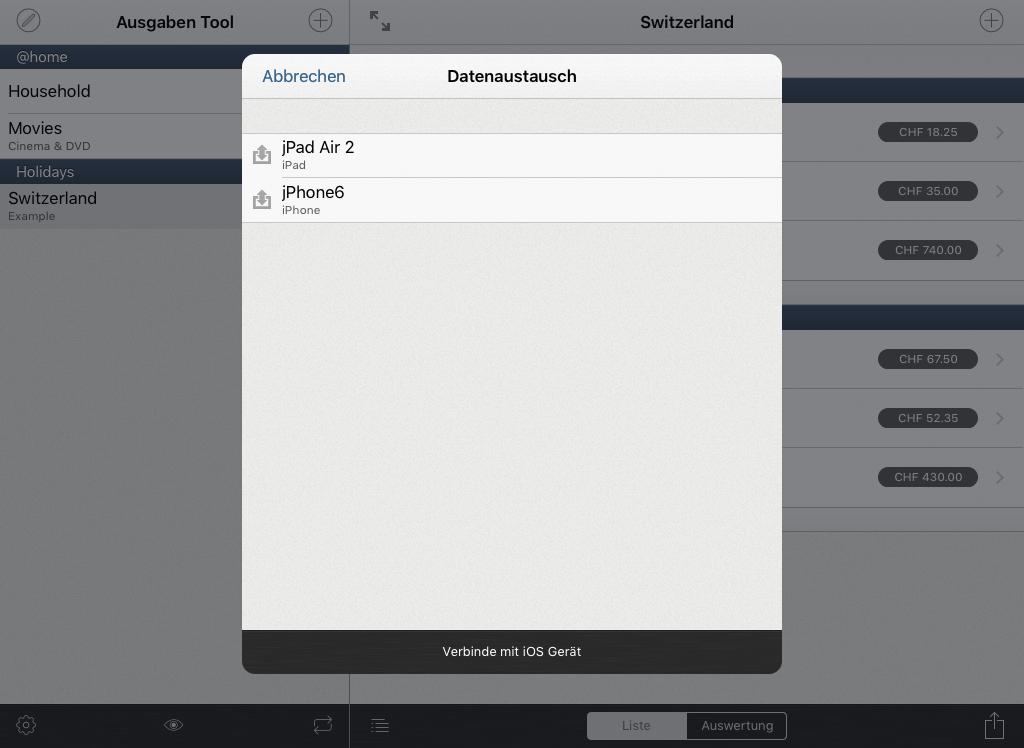
- Tap the button Data Exchange (bottom right) in the list of your expense sets.
-
All your expense sets will be shown again. Select the expense sets, which you'd like to transfer to the other device.
Note: If you just want to receive data from the other device, simply don't select any expense set to send. -
Tap the button Continue (Arrow-right, on the top right).
The data which is going to be send is being processed - this could take a while. - If you've enabled both Online (Wi-Fi) and Nearby (Bluetooth), choose the appropriate Transmission method for both devices. If you've only enabled one of the two in Settings, you don't need to choose a transfer method. The same applies to the setting Expense Tool 2.3: Bluetooth and/or Wi-Fi gets determined automatically, so there's no choice needed.
- The list will be populated with the devices found. On one device: choose the other device. The other device then needs to accept the connection.
Note: Searching for other devices and connecting to another device can take 30-40 seconds each. Please be patient...
Only one device can establish a connection to another. If you try to do this on both devices at the same time, it won't work. - Once the connection is established successfully, the two devices are going to exchange their data of their current Expense Sets.
Note: This Exchange can take quite a while depending on the chosen data transfer method and the amount of data (Number of expenses, Receipts, Photos). - If Expenses need to be added or changed on one device, a List will be shown. Should you not want to accept a new or modified expense, you can ignore it by tapping the --button and confirming with Delete.
Note: If an expense set does not yet exist on the other device, it will get created. - In order to save the changes according to the List displayed, tap the button Save.
Note: If a lot of data is going to be saved (Number of Expenses, Receipts, Photos), this could take a while. - Finally, the list of your expense sets will show again. New and modified expenses of the other device are now included, assuming you haven't cancelled but saved.
Why doesn't the second device show up?
- You need to select Data Exchange on both devices.
- Make sure that both device are using the same transmission method (WiFi / Bluetooth) verwenden.
Why is there no cloud-synchronisation?
You decide, which Expense Sets of which devices you want to transfer. Data is sent only from device to device - so there are no external servers in the internet involved, where your data needs to be stored. No internet connection is required, e.g. while being on holidays in a foreign country.
Depending on the point of view, advantages of a cloud-synchronisation can also be disadvantages. The same applies to what is implemented in Expense Tool: Transfer from device to device.
For sure, the Data Exchange is such as Expense Tool itself: simple, yet powerful.
How about iCloud synchronisation?
iCloud synchronisation is not supported.
The reason is, that the iCloud synchronisation functionality works quite well for Documents (e.g. a Text-Document). However, for Databases with Relations (Expense <-> individual Amounts-to-pay => Summary) the iCloud infrastructore simply doesn't work reliably enough at this time.
Many other developers and companies don't support this, too - even though they'd love to do so...
If you're interested - here's a story to read:
Why doesn't iCloud 'just work'?
Furthermore, it's not possible to synchronize data between multiple Accounts. Let's assume an expense set for your Household-expenses: To be able to synchronize between multiple accounts would be a requirement, because (most often) the partners don't use the same iCloud Account.
Data Management
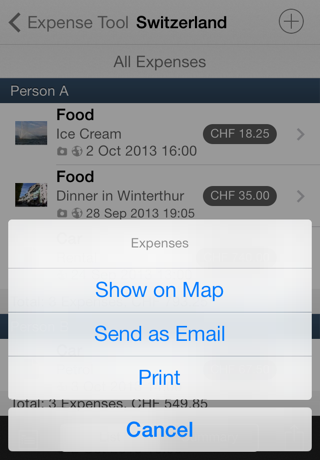
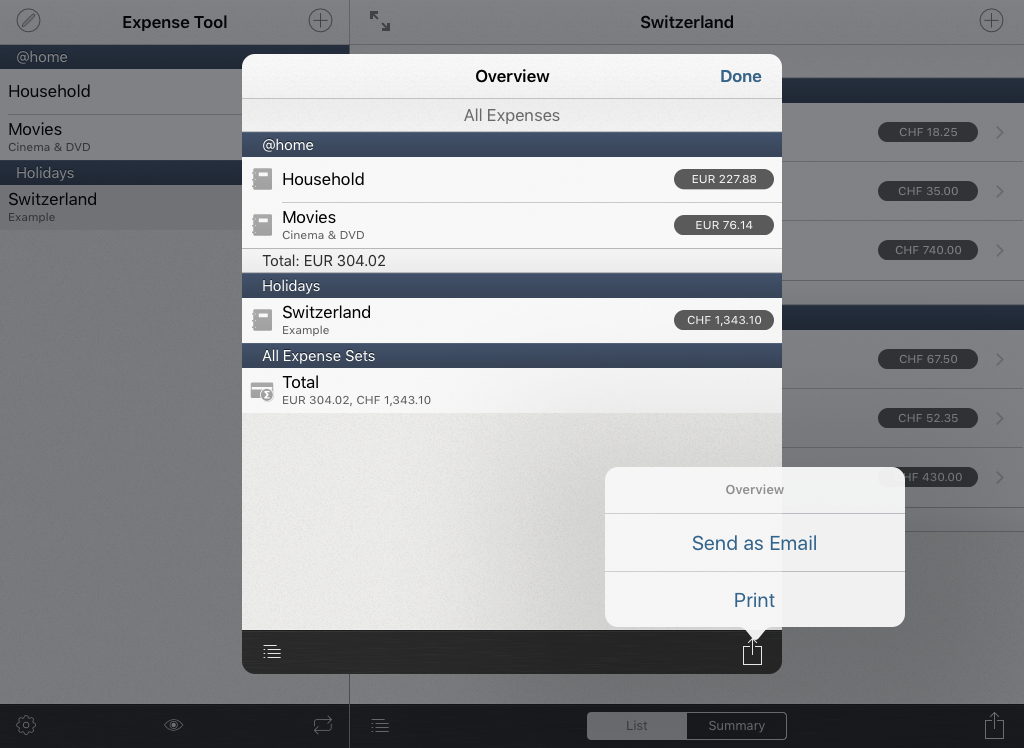
How to export or print the data?
Navigate to the Expense Set and choose the list or summary view, or show an individual expense. Tap the actions button at the bottom right.
Select Send as Email or Print.
Note:
The data is sent unencrypted by Email, so be careful with sensitive or personal data.
Exporting a lot of data
Let's assume: you have entered 250 expenses in an expense set in the last four months. A receipt and photo is attached to each one. As you can imagine, this will easily result in raw data of > 50 MB. And if this raw data is being converted and worked up in order to be printed or sent as email, it may become even more - and the operation will certainly use a lot of memory.
If you try to print or send as email this whole list containing a lot of data at once, your device is likely running out of memory. Remember, it's a mobile device - and not a computer with several GB of memory...
Hint:
Try to limit the data. It's recommended to only print or send as email the monthly list instead of the list of all expenses.
What format is used for export?
The export will send a HTML or plain text Email. You can configure this in the settings. Navigate to the list of Expense Sets, and tap the Settings button to change your preferred format.
You can optionally attach the photos/receipts to the list of expenses, as well as a CSV (Comma Separated Values) file. Again: configure this in the settings.
If you just send a single expense, photo/receipt is always attached.
The CSV file is encoded as UTF8, the values separated by semicolon. If your software doesn't display the data properly, make sure you use these settings to open or import the CSV file.
How to open the CSV file?
General
The CSV file is encoded as UTF8, the values separated by semicolon. If your software doesn't display the data properly, make sure you use these settings to open or import the CSV file.
OpenOffice
Right-Click on the CSV file and open it with OpenOffice. An Assistant is shown. Set the Encoding to UTF8 and the Delimiter to Semicolon. If the expenses show correct in the Preview, confirm with OK.
Excel
Launch Excel and open a new, empty Spreadsheet. Open the Convert Text Assistant in the Menu Data -> From Text. Set the source-type of the CSV file to Delimited (e.g. Comma or Semicolon), and the Source 65001: UTF8.
In the next step, set the Delimiter to Semicolon. Finish the steps of the Assistant. Now the data of your CSV file is available in your spreadsheet.
Can I restore data?
If you're deleting an expense set or an expense, or if you loose your data some other way, there is no undo functionality.
It is recommended to create backups periodically (please refer to the corresponding FAQ section). Backup your backups additionally, and also backup your entire iOS device using iTunes.
If you have a backup copy and it's available to you, you can import the whole content of your backup (please refer to the corresponding FAQ section).
Backup / Import
How can I create a Backup?
- Navigate to Settings (Gear-Icon in the list of your expense sets).
- Choose: Database: Backups.
- Tap the button Backup now
Backup to device: The backups you create are stored in the documents-folder of Expense Tool - but they are still only on your device.
Should your device be defective or get stolen, you don't have any possibility to retrieve those backups.
It is strongly recommended to transfer the backups to your computer and archive them in some other place!
Backup to iCloud: If you've enabled iCloud Drive, you can copy your backup to your computer via iCloud Drive.
Backup to Storage Provider: The created backup is handed over to the application of the Storage Provider (e.g. DropBox, OneDrive, Synology).
Where are my backups?
Backups on device
The Backups you created are stored in the documents-folder of Expense Tool.
Using iTunes - FileSharing you can transfer those files to your computer and archive them.
If you don't archive your backups yourself, you can only restore all data of all your apps (e.g. when you get a new device) using iCloud or iTunes-Backup.
It is therefore strongly recommended to copy your backups to your computer and archive them!
Backup to iCloud: If you've enabled iCloud Drive, you can see your backup on iCloud Drive.
Backup to Storage Provider: The created backup is handed over to the application of the Storage Provider (e.g. DropBox, OneDrive, Synology). Use their tools to access the files.
How do i copy and archive the local backups to my computer?
- Launch iTunes on your computer and connect your iOS device.
- Choose your iOS Device in iTunes, navigate to the tab 'Apps'.
- At the bottom of the list you'll find the apps which enable FileSharing.
- Choose Expense Tool in that list.
- You'll see the created backups in the list of documents (on the right).
- Using Drag&Drop you can copy the files to your Desktop (or some other folder).
The Backups you created locally on your device and saved locally to your device are stored in the documents-folder of Expense Tool. Using iTunes - FileSharing you can transfer those files to your computer and archive them.
How do I copy a backup from the computer to the app?
- Launch iTunes on your computer and connect your iOS device.
- Choose your iOS Device in iTunes, navigate to the tab 'Apps'.
- At the bottom of the list you'll find the apps which enable FileSharing.
- Choose Expense Tool in that list.
- Using Drag&Drop you can copy a backup stored on your computer back into the app's documents folder (on the right).
Backups in iCloud: You can choose the Backups available on iCloud (Drive).
Backups from a Storage Provider: The Storage Provider displays the choice of available documents. Choose the backup you're looking for from them.
Backups on device
Using iTunes - FileSharing you can copy a backup stored on your computer to your iOS device.
How do I import a backup?
- Navigate to Settings (Gear-Icon in the list of your expense sets).
- Choose: Database: Backups.
-
You'll see a list of backups available on your device.
Hint: If you have a backup in some other place (e.g. your computer) and would like to copy it to your iOS device, please read the question above. -
Choose the backup you'd like to import.
Note: The whole content of the backup is going to be imported. Already existing data will not be deleted.
Why are the files in iTunes FileSharing locked?
The backups you create are protected by an iOS feature called Data Protection. You can only access the files if you're iOS device is turned on and unlocked.
If you've enabled the Pin Code Protection of your iOS Device, you'll have to enter that iOS code, so that your device is in a state ready to use. Only then you are granted access to the files stored on it.
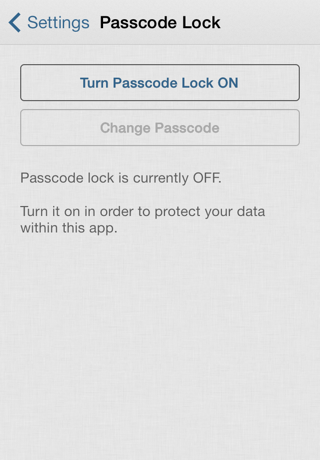
Passcode Lock
How secure is the passcode lock?
If a passcode lock is set, data entered in the app can only be displayed after entering the passcode. Thus this protects against unwanted looks at your data, once your device is in some other person's hands.
The passcode lock is designed in a way which allows you to unlock yourself! Therefore, the protection won't last very long - with a bit of time and a computer, the protection can be removed.
In order to protect your data (not only in Expense Tool) more secure, it is recommended to activate the passcode lock of the iOS device! This will additionally secure access of all data and files stored on your iOS device.
How to dis/enable the passcode lock?
- Navigate to the Settings (Gear-Icon in the List of Expense Sets).
- Choose: Passcode Lock.
- Now you can set/change a passcode or deactive the passcode lock.
I forgot the passcode - what to do?
The passcode lock is designed in a way which allows you to unlock yourself!
Once you've entered a wrong passcode for 6 times, you'll get an Alert with a link to these FAQ.
From now on it is possible for you to reset the passcode.
Follow these steps to reset the passcode:
- The passcode needs to be entered wrongly at least 6 times.
- Launch iTunes on your computer and connect your iOS device.
- Choose your iOS Device in iTunes, switch to the Tab 'Apps'
- On the bottom you'll find a list of apps, which allow FileSharing.
- Choose Expense Tool in the list.
- You'll see the list of documents (on the right). There is a document with filename lock.txt.
- Drag-and-Drop the Text-document lock.txt on your desktop (or some other folder).
-
Follow the instructions in the text-document.
Hint: Copy the text to your iOS device. You can do that by sending it via E-Mail or using the Notes app.
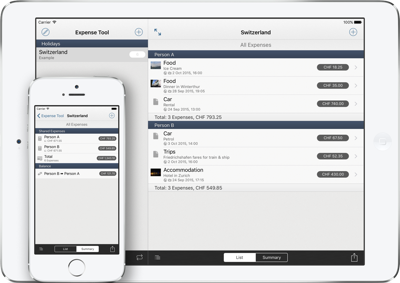
Screenshots iPhone
The Screenshots show Expense Tool running on a device configured for english language.


Screenshots iPad
The Screenshots show Expense Tool running on a device configured for english language.


Contact
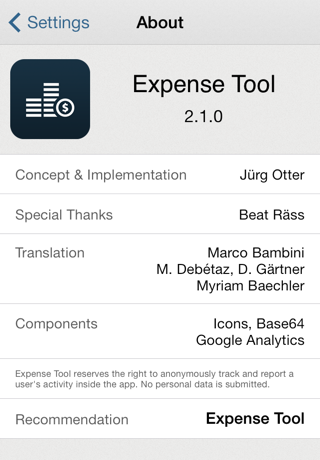
Concept & Implementation by Jürg Otter.
For more information, write in English or German to:
expense-tool[at]jo-tools.ch